How to Configure External Access for IPCop?

IPCop
The Open source community always provides handy tools for system admins to make their day-to-day operations simple. IPCop is one of such a tool, in fact a Linux distribution that aims to provide easy to manage firewall application. It’s a tasteful firewall built on the Linux netfilter framework, forked from Smoothwall Linux firewall in 2001.
So today, we’re going to configure external access for IPCop
From the setup menu of the firewall of IPCop, it’s possible to configure external access to perform maintenance and administrative tasks on your server from outside, that is to say since WAN and therefore the network called RED for IPCop.
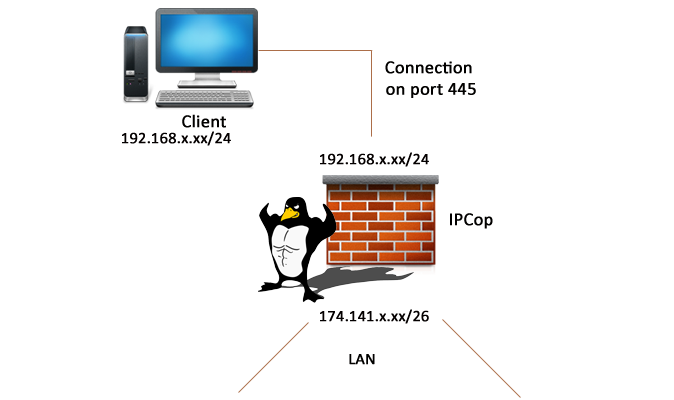
So we can only allow the IP address of a machine access on port 445 through IPCop to our server from the WAN. Allow only one IP address or setting the limit will keep a layer of security in the accesses from the “Dangerous Network” represented by the exterior.
Of course, you can allow multiple connections from any IP address, but we would not recommend you to do so. It is better to be limited to, IP addresses that you can trust.
In this tutorial, we are referring IPCop version 1.4.21, the last stable version, though it has a limited functionality, however, it is flexible enough to allow installation of various addons to enhance it to commercial grade firewalls. This tutorial is also applicable for version 2.0.x as the principle remains the same.
Configuration
Now, we will configure access for the client on our IPCop by RED interface on port 445 only for access to the administration interface.
To do this, connect the interface to your management console since IPCop to set up the configuration. Log on to the interface using the account “admin”. Through the menu, go to the “Firewall” and then “External Access”.
So you get this form:

Here are some explanations to help you understand:
– TCP / UDP: connection protocol to use, in most cases this will be TCP.
– Source address or IP network (blank for “ALL”): You must indicate to whom you allow access, i.e. with a single IP address, a range of IP addresses (a network) or all IP addresses.
– Destination Port: The port on which you wish to arrive on IPCOP, for example to access the HTTPS administration interface will be indicated 445, 222 for SSH, etc.
– Enabled: If this box is checked and external access configured it means the rule is registered but inactive. So once you click on the Enabled box, next press Add button. It will assign the rule to the next section and you will see listed as an active rule.
– Destination IP Address: This field will keep contents “DEFAULT IP” which is the IP address of your RED interface / RED. This is logical since they will not do a redirect, but configure external access to our IPCop server.
– Note: Enter a comment to describe this rule in order to find your way between all of your external access rules.
It remains only to click on the button “Add” to see the external access rule appears in the list of rules. Finally, test your external access by connecting from the IP address authorized by the RED interface.
Regarding IPCop version 2.0 or greater, it is also possible to access the external access configuration where the configuration is complete. Indeed, it is possible to enable or disable logging for a rule and specify a time range in which the rule applies, interesting anyway!